


How to blog with Showit blog: A Step-by-Step Guide
June 18, 2024
When I discovered Showit, I remember one of the first things that caught my attention was the mysterious integration with WordPress. It turned out that setting up a blog was easier than I thought. Basically, you choose the right pricing plan and receive WordPress admin access, where you can post blogs effortlessly.
In this guide, I’ll walk you through the steps to get started and make the most of your blogging experience with Showit.
1. Set Up Your Showit Account
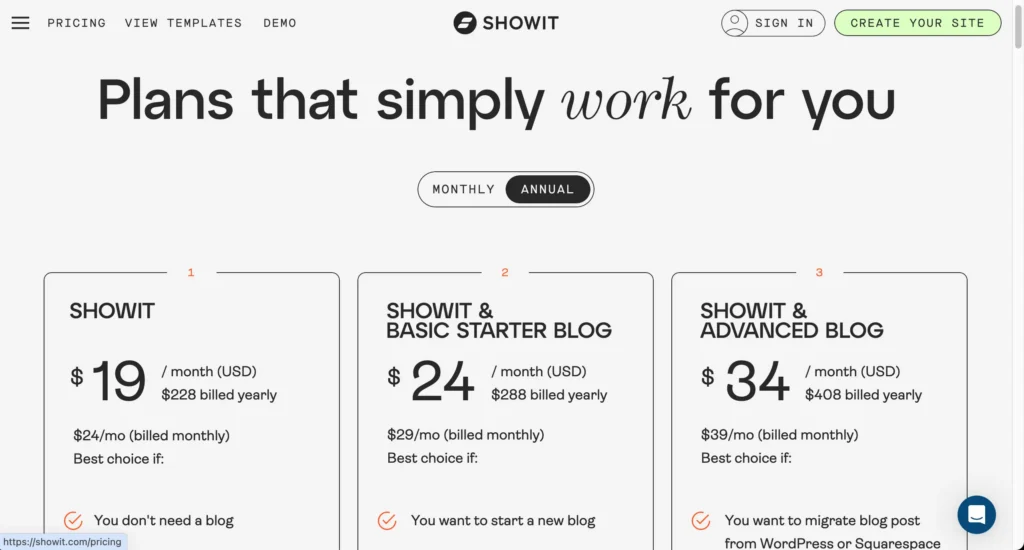
Showit offers three main pricing plans. For blogging, you’ll need either SHOWIT & BASIC STARTER BLOG or SHOWIT & ADVANCED BLOG. What’s the difference between these two? Well, if you don’t have many blog posts yet and want to start a new blog, Showit & Basic Starter Blog is the right choice for you. If you want to migrate blog posts from WordPress or Squarespace, or if you want to use any cool plugins (like WooCommerce, which allows you to set up a shop with Showit!), then the Advanced Blog plan is for you.
Personally, I use the Advanced Blog plan mainly for WooCommerce. Having tried all Showit plans, I recommend Showit + Basic Starter Blog for entrepreneurs and agencies looking to dive into SEO and increase traffic to their site. The Basic Yoast SEO plugin is available with this plan. For just $29 per month or $24/month annually, you get a WordPress engine blog along with a creative Showit design. Sounds good to me!
Remember, you can always switch between plans (as I did, lol). And if you haven’t tried Showit yet, use the code “digitalandchic” for one free month of Showit.
2. Design Your Blog Layout
Now let’s dive into the Showit builder. To create a blog, you first need to design it. Essentially, you’ll need at least two pages: the Blog page and the Single Blog Post page. Additionally, you can also create pages for Podcasts, Categories, a 404 page, and more, but let’s focus on the essentials for now.
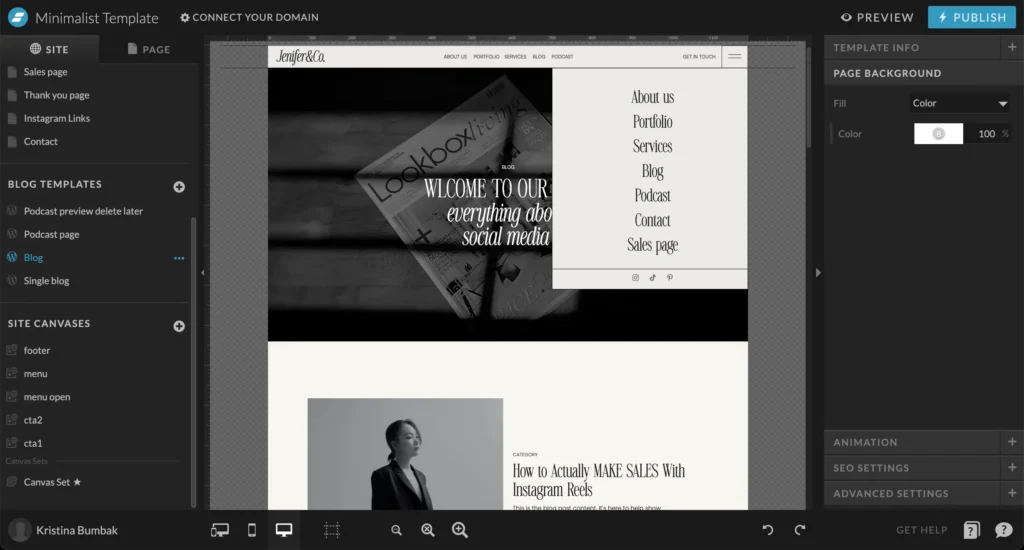
Refer to the screenshot. The Blog pages are located under the Blog Templates tab in the left column. Only two pages are necessary. The main Blog page showcases your blog posts, categories, search function, and other sections.
Main blog page
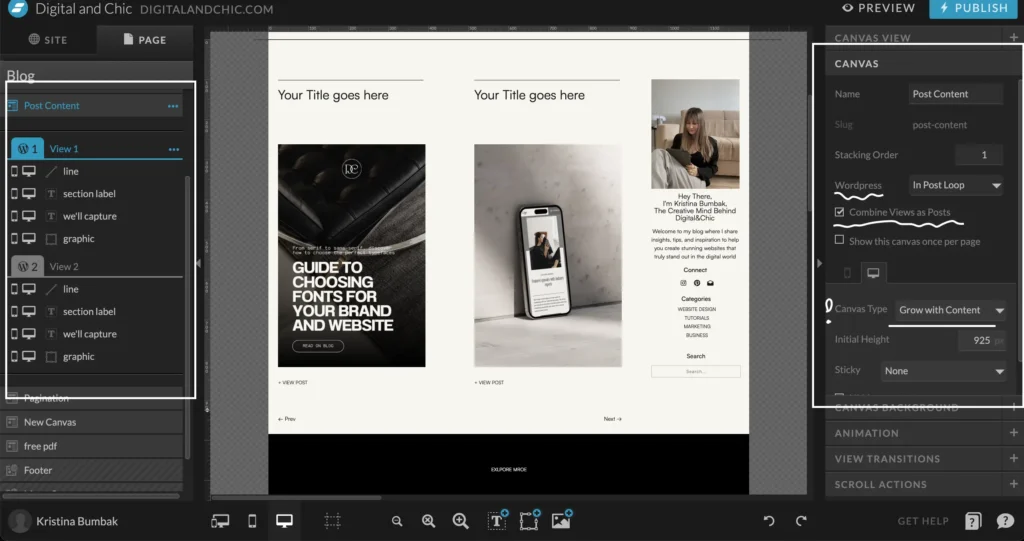
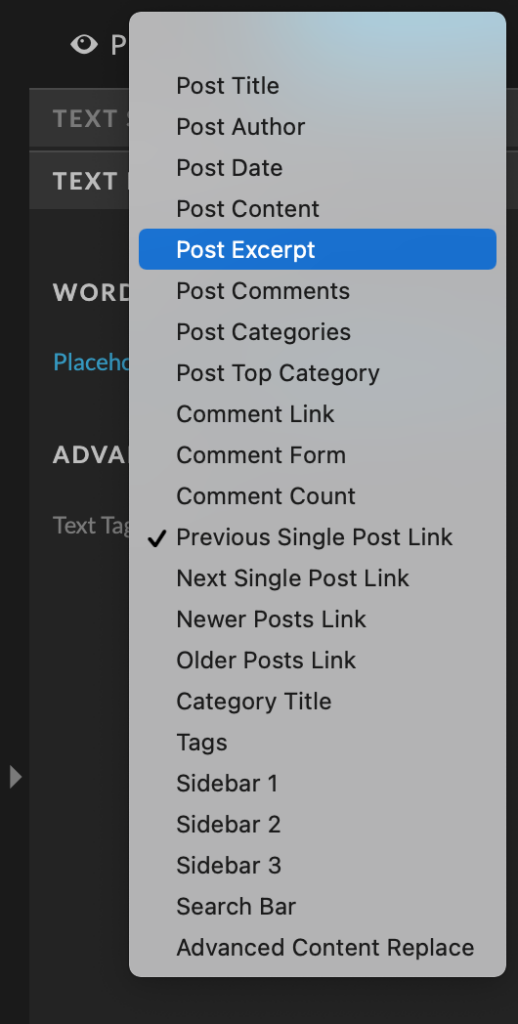
Next, let’s explore the blog posts carousel. Here, you can currently see only two canvas views, which are templates that show WordPress how blog posts should appear. As you create posts, more templates will be added. In the left tab, there are two canvas views, each containing a title, image, and “View More” button. To turn these into posts, you need to set up a Text property. To do this, click on Text Properties in the right column, then navigate to WordPress, Placeholder, and select the appropriate property. For instance, set the post title as “Post Title,” the featured WordPress image as “Featured WordPress Image,” and link the “View More” button to the blog post (under Click Actions in the right column, choose WordPress Post).
Please note in the right column under the WordPress tab, “In Posts Loop” is selected, which means posts will repeat in this manner. The “Canvas Type: Grow with Content” indicates that as more posts are added, the section will expand. It may seem overwhelming initially, but once you’ve set up all the WordPress properties in the right column, it will make sense on your live blog.
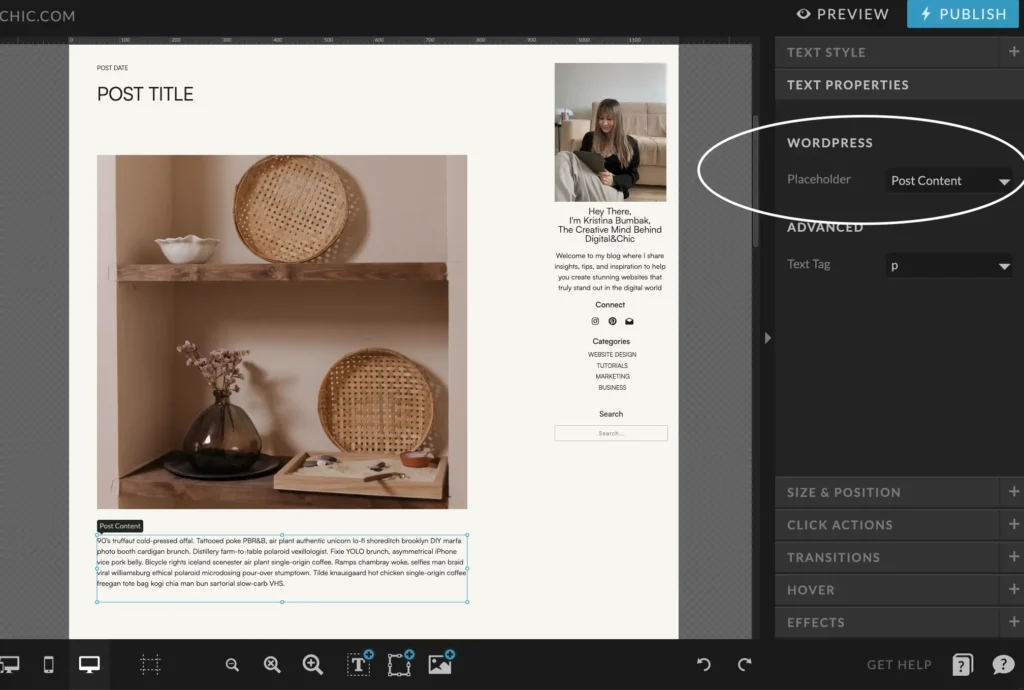
The Single Page
The Single Page is simpler; here, you just need to set up properties like a title, image, and paragraph, and you’re good to go. You can also add a date, category, comments, navigation to the previous or next post, and more.
If you’re unsure how to set up anything, Showit provides free blog templates that closely match your website design; you can customize these. Alternatively, I can recommend purchasing blog templates or full Showit templates that already include a blog template. Check out some options in the Digital&Chic store if you’re interested 😉
3. Create a blog post in WordPress admin
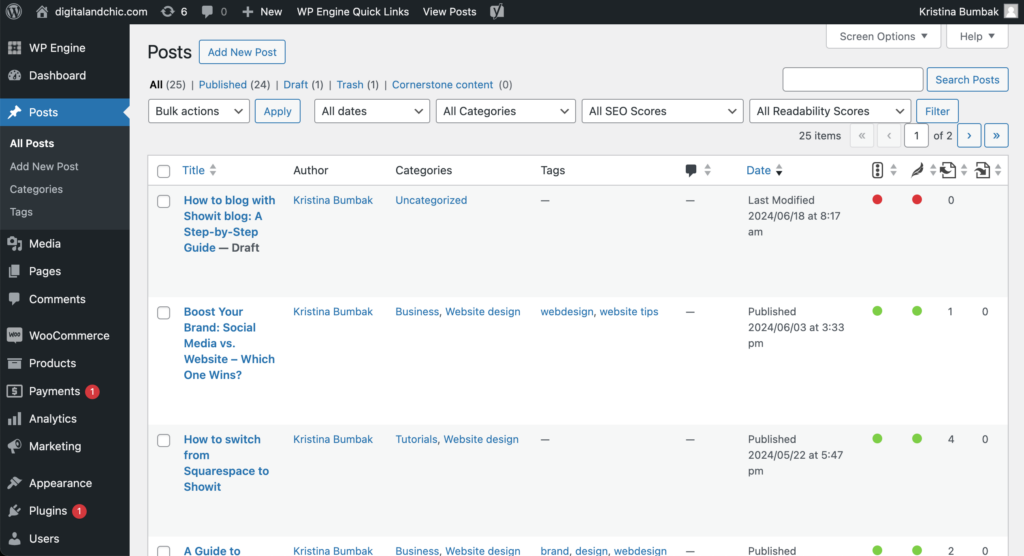
Showit Support will provide you with a login and password for the WordPress admin panel. Inside the admin panel, you’ll find the “Posts” tab on the left. “All Posts” is where all your blog posts are collected. And to create a New post you guess it right… Click Add new post
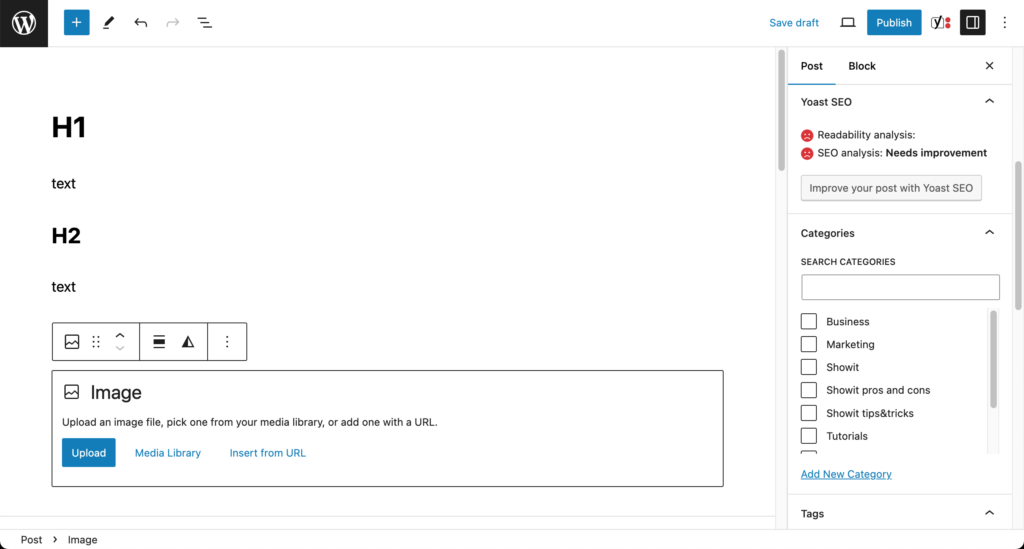
Inside the WordPress post builder, it’s straightforward. Just remember what’s good and what’s not for SEO. There should be only ONE Title, aka H1. Use H2 for other titles, and so on. For images, it’s better to use the WEBP format (use a converter) because it’s smaller in size and better for SEO. However, the Featured Image should be JPG, if I’m correct. Don’t forget to fill in the image alternative text and description; while not super necessary, it’s also better for search engines to read your post.
In the right column, you can choose categories, add tags, set a featured image, and include an excerpt (if you have it in your main blog page design).
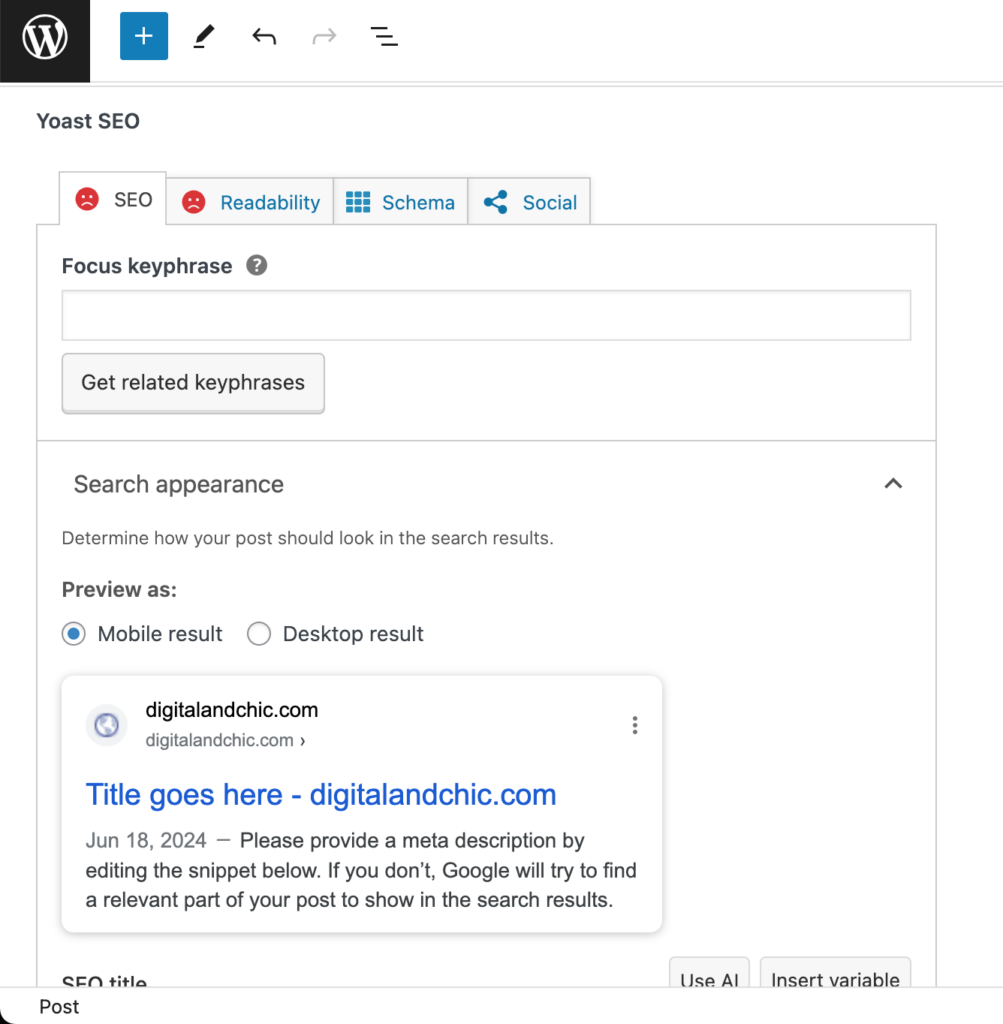
After writing a blog post, below you’ll find Yoast SEO. I believe I talked about it more in my SEO blog post, but briefly, it’s a tool that helps reduce SEO mistakes, add a meta description, and improve readability. Basically, it offers advice. Ironically, I’ve noticed that my older posts with orange or red Yoast emojis sometimes perform better in search results than those with green ones. So, content does matter, guys!
4. Publish and repeat
Congratulations! You’ve taken the exciting step of publishing your first WordPress blog post. Now that your content is live, it’s time to maximize its reach and impact. Don’t forget to share your blog posts on social media and Pinterest.
Blogging is a journey that requires patience and persistence. Celebrate each blog post as a milestone and continue to learn and grow along the way. Remember, Rome wasn’t built in a day—consistent effort and dedication will lead to meaningful growth over time.
Congratulations again on becoming a blogger! Stay motivated, keep creating valuable content, and enjoy the journey ahead
exlpore mroe
Resources
take a look
Find a collection of my favorite tools, resources, and products for your business! From free Showit templates to websites tips. Explore and enjoy!
")
templates shop
shop templates
Easy to use Showit website templates are the perfect option if you are on a tight budget, on a short timeline, or want to customize a website on your own

work with me
work 1:1
With our website design template customization service, you can have a stunning and fully personalized website without the hassle of doing it yourself.
")